Curriculum
Lecture 1: Introduction
“How To Use A DSLR or Mirrorless Camera” is written for anyone interested in using an interchangeable-lens digital camera to shoot pictures or videos at a professional level of quality. Some images used to explain the concepts are from a Canon DSLR. If you are a user of another type of DSLR, a mirror-less camera, or another type of Interchangeable Lens Camera (ILC) system, you will still find that the concepts are universal and photographic controls are similar among different types and makes of cameras. The concepts of using a DSLR camera to professionally shoot imagery are universal to many different camcorder or photographic camera systems.
Instruction manuals can be confusing. Instruction manuals, when they are between 200 and 800 pages, are the reason why many people operate their cameras from instinct, rather than study. Interchangeable lens camera systems like DSLR Cameras are very complicated pieces of technology, and correspondingly, the manuals provided are also complicated and lengthy. Photographic manuals, which depict every little feature of the camera, are tedious to read. To solve this problem, we have put together a guide that features all of the core principles of camera operation and outlines all of the critical functions of the typical interchangeable lens camera system.
To get good results with a digital camera, the typical camera user should take a bit of time to read the camera’s instructional manual and online professional guides on camera use. If the camera user forgets to do this, they run the risk of being limited in what they can achieve with their camera when it comes time to shoot imagery. Simply put, footage shot by a camera user who doesn’t know how to maximize and utilize the various functions of the camera, will not look very good. Such a photographer will generally feel frustrated and limited by their skills gap. After studying professional camera guides, you will be able to produce good results under various environmental and lighting conditions.
Another important reason why reading a professional guide on digital camera use is important, has to do with the fact that such cameras are able to produce imagery that looks “unique”, “professional” and “cinema-like”. The “cinema look” is desirable because audiences instantly recognize the look as having been filmed by a professional or produced by a professional production company. The cinema look can be achieved because interchangeable lens camera systems have a great deal of controls and customizations on board the camera system, which allow the camera to control the recording process. Everything from how light enters the camera, to the type of lens controlling the perspective and many other features.
After reading the guide, you will learn how to control the camera in the same ways that professional photographers and cinematographers control their cameras as they capture high quality footage. These skills will enhance the quality of the footage which you take, will enhance your enjoyment of using the equipment, and will even prepare you to use the skills of video whenever they may be needed on a project for marketing websites, film productions or other project endeavours. Plus, great video is fun and engaging!
What will students learn?
Mode Dial (Canon), How To Attach or Detach A Lens To A Camera Body, Auto Shooting – Composing The Shot With A Cinematic Perspective, Live View, Shooting Tips (Landscape, Close-Up, Moving Object, Night Portrait, Portrait), Using The Lens Manually, Image Settings (ISO Speed, Still Images), Picture Styles (Auto, Landscape, Neutral, Portrait), Colour Temperature (Kelvin) – White Balance, Program AE, Shutter-Priority AE, Aperture-Priority AE, Manual Exposure, Manual Exposure (Video), Long Exposure (Bulb), Metering, Metering Mode Selection (Evaluative or Matrix, Center-Weighted, Partial, Spot), Other Important Features (Wind Filter, External Microphone, Headphones), Histogram Display (Underexposed, Exposed To The Left, Neutral or Optimal Exposure)
Who is this course for?
- Filmmakers or video producers who need to film in a cinematic way.
- Photographers who are curious about video production using an ILC camera.
- Video makers who have not produced video works in a professional way.
- Videographers who haven’t filmed in a while, and wish to use an ILC camera.
- Business owners who wish to add video to their online platforms.
- Social Media specialists.
- Marketing specialists.
- Anyone who owns a DSLR or mirrorless camera, and wishes to learn the main features.
- Anyone who uses a DSLR or mirrorless camera to film videos.
Lecture 2 – Camera Controls (Part 1)
Lecture 2: Camera Controls (Part 1)
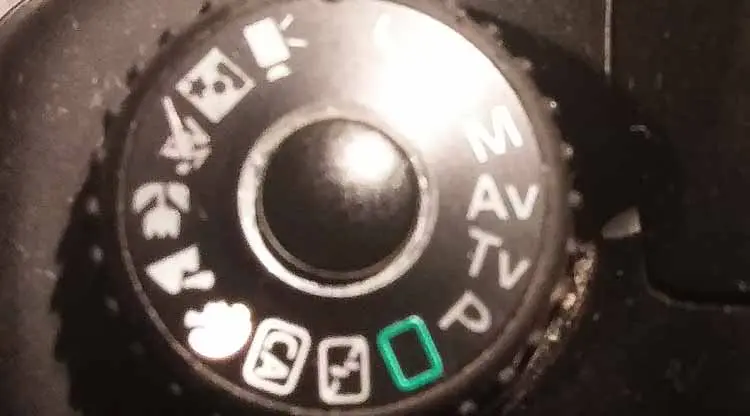
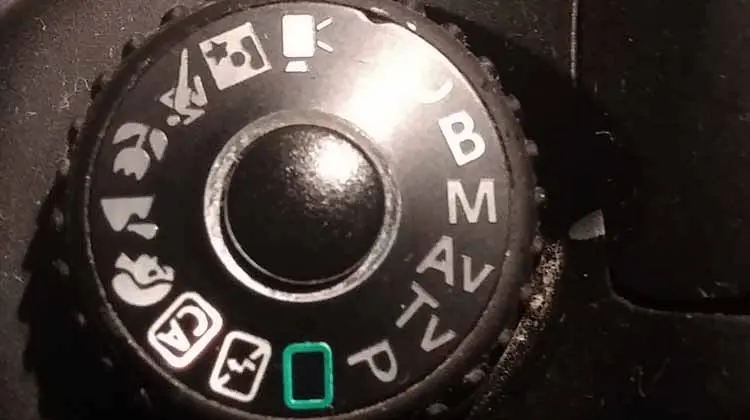
Mode Dial (Canon)
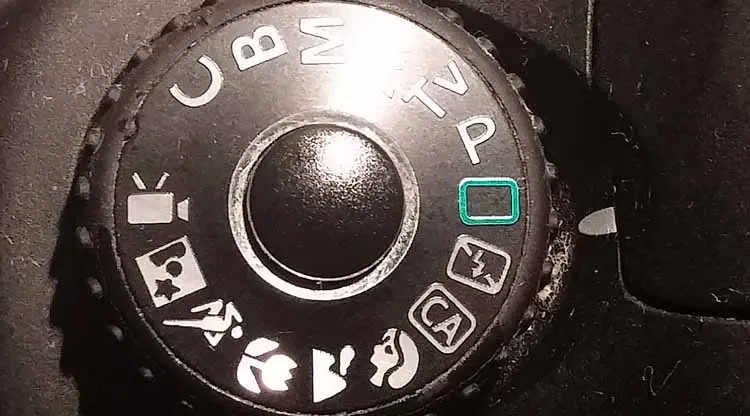
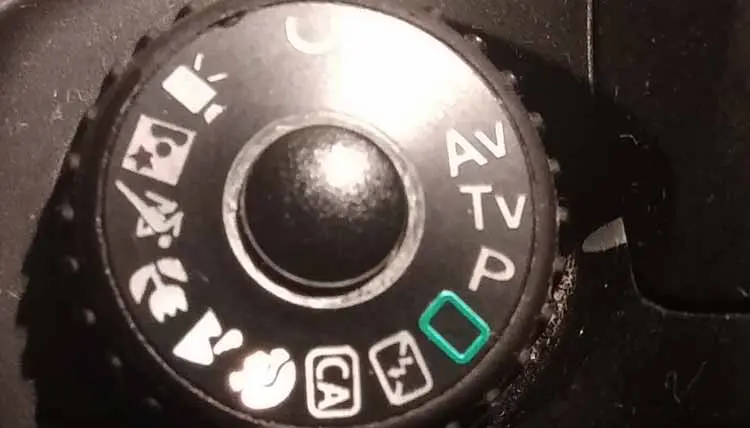
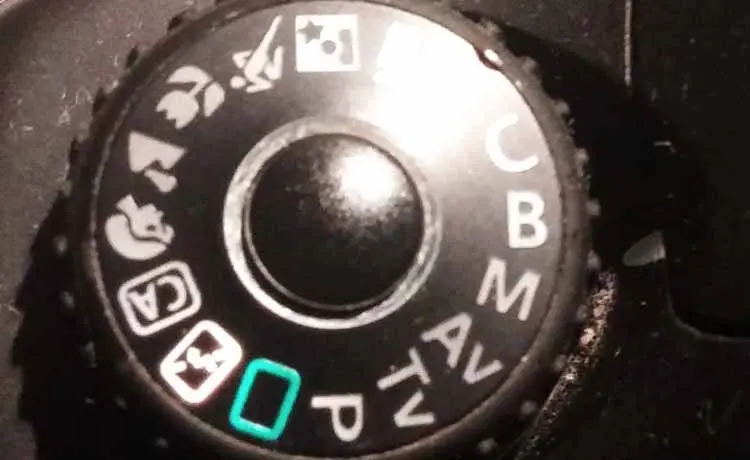
One of the most important parts of the camera to understand is the circular mode dial on top of the camera. It controls the basic functions of the camera. Pressing on the middle of the mode dial, will allow the dial to turn. The different positions of the dial will enable different shooting modes. We will cover the operations of mode dial functions throughout this guide.
How To Attach A Lens To A Camera Body

The process of attaching a lens to a camera body is fairly simple. Start out by removing any cap that may be on the lens and on the camera body. In order to attach the lens to the camera body, the lens and camera body have to be aligned such a way that the notches on the mounting edges fit together.

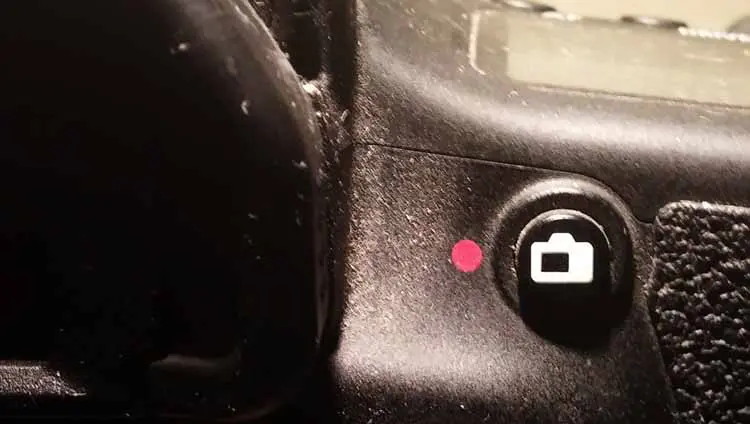
There should be a red dot at the base of the lens and also a red dot on the camera near the mounting ring. Align the red dot on the lens with the red dot on the camera, pop the lens in, and then turn the lens until a click confirms that it has locked into place. Also, make sure that dust or other foreign matter does not enter the camera body. That’s all there is to it.
How To Detach A Lens From A Camera Body

To remove the lens, you first want to turn the camera off. DSLR cameras will have a prominent lens release button somewhere near the outer edge of the camera’s mounting ring. On Canon cameras, it is usually just right of the lens on the camera body. Hold down the lens release button; simultaneously turn the lens until it stops turning and then pull out the lens. Proceed to put on the cap on the camera body so that dust does not accumulate inside the camera. Put on a cap on the back of the lens as well.
Auto Shooting
Every DSLR camera nowadays has an automatic function that enables novice users to shoot without the worry of having to set up the settings necessary to effectively shoot an image. This ‘auto mode’ or [A] mode makes taking pictures or videos easy for novices and even for professionals. All one has to do, is to engage [A] mode, and then one can shoot without worry that something will go wrong with the image capture.
When shooting in automatic mode, the camera scans and assesses the scene, and then sets the optimum settings. If also using a modern lens capable of auto-focus, then the camera also focuses automatically. Further, the automatic mode makes the colours look great in outdoor, sunset and nature scenes. Though in the past, professional videographers would have not considered to shoot in automatic mode, this notion has begun to change. The automatic modes built into cameras have advanced in capability and quality output.
The interesting part about shooting in automatic mode is that cameras are becoming increasingly effective at adjusting all of the necessary image parameters, often resulting in the creation of professional imagery without any user intervention. For example, the DSLR cameras scan the scene and then adjust properties such as focus, and then are able to keep focus sharp even though subjects are moving within the image. All a user has to do is to keep the Auto Focus frame on the subject, and the camera does the rest. No more manual focus pulling!
Auto Method #1 – Composing The Shot With A Cinematic Perspective

When composing the shot, a lot of novices tend to place the subject or object of interest in the center of the frame. It is generally agreed upon in the filmmaking community that centering objects or subjects in the frame does not look very cinematic. A lot of professional cinematographers use a “Rule Of Thirds” to break the image into thirds, both horizontally and vertically, or to have the image divided into 9 equal squares. The cinematographers then end up aligning the objects in the scene along some of the dividing lines. In simple terms, putting a character on the left of the screen or on the right of the screen, rather than the center, will create more of a “professional image”. Because the camera will focus at the center of the image where the AF frame is, in automatic mode, then how does one keep a character in focus that is not in center of frame? In the Auto or [A] mode, to achieve a “Rule Of Thirds” type of perspective, one has to perform a “focus lock”. First, center the character on screen. Second, press the shutter button halfway to achieve a focus. Third, adjust the cameras perspective by tilting the camera slightly left or right. Last, press the shutter button all the way, to take the picture.
Auto Method #2 – Keeping Perfect Focus a Moving Subject or Object
It can be very difficult to manually focus a moving subject with the level of precision that is required to keep the subject in focus as their distance changes relative to the position of the camera. If the subject moves, and the cameraperson focuses manually, it is often the case that the image temporarily visually blurs completely until the focus puller can find the new point of focus. Luckily, modern cameras have an automatic function, and this provides the camera ability to focus on the subject continuously. Simply keep the AF frame over the subject and press down on the shutter button half way. From this point on, the focusing will be ongoing and you can follow the subject on screen while the camera maintains a perfect focus. When the moment is right, press down on the shutter all the way, and a perfectly focused shot will result.
Lecture 3 – Camera Controls (Part 2)
Lecture 3 – Camera Controls (Part 2)
Live View
The image that the camera sees can be displayed and monitored on the back LCD monitor, instead of through the viewfinder. Sometimes there will be a switch near the viewfinder that needs to be set in order to activate this mode. Once activated, simply focus the lens, and then take the image.
Shooting Tips
Landscape Tips
Landscape shooting requires a wide-angle or very wide-angle lens. Everything in the scene, objects that are close and objects that are far, will be captured in focus. If the camera has a landscape mode, use it. This mode will enhance the blues and greens so as to provide a crisp landscape image.
Close-Up Tips
Shooting close-ups involve shooting small objects such as flowers and bugs. The goal of this shooting style is to increase the apparent size of the object, while also showing all of the miniature detail not regularly visible. Most likely, this shooting style will require the use of a macro lens. However, there are some lenses, which have a small minimum focusing distance, and this allows the lens to focus to objects right in front of the lens.
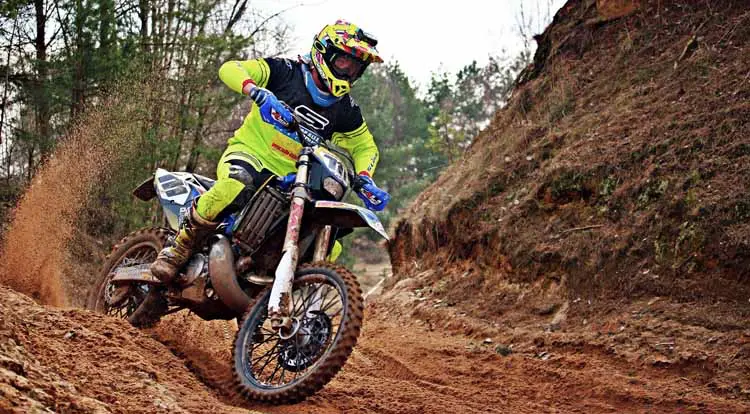
Moving Object Tips
Shooting moving objects involves capturing sports or other high intensity action. Capturing the ‘right moment’ or ‘most cinematic moment in time’ from a sequence of motions, requires quick reflexes and a fast reaction time. A way to gain an advantage is to simply shoot continuously. Start by pressing the shutter button halfway. This camera will focus and the AF point will be fixed. The camera will indicate if focus is being achieved or if it is not, either through a colour or a beeping sound indicator. Provided that focus is achieved, simply wait for the right moment, and press the shutter button completely to take the photo.
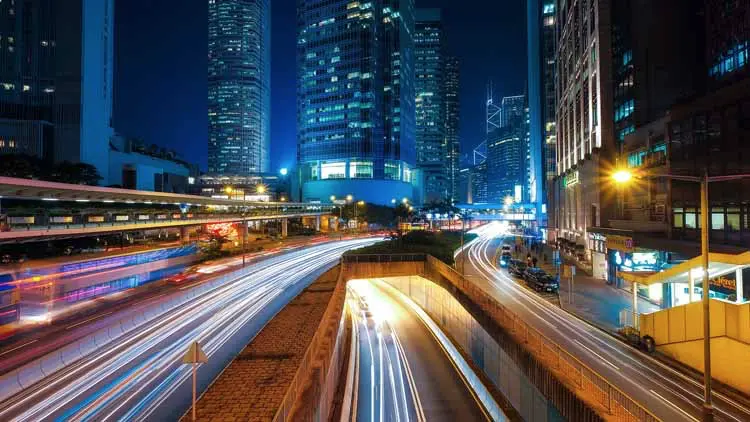
Night Portrait Tips
First, attach a speed-lite. Second, find a beautiful and bright night background scene, such as a well lit city background. Third, use a tripod to avoid blurry motions. Fourth, use a wide-angle lens to obtain a panoramic view.
Portrait Tips
Shooting portraits involves blurring the background a bit, and this helps to differentiate the foreground subject from the background. It also beautifies the subject by making the hair seem soft and the skin tones seem smooth. However, relying on electronic processing to achieve a great portrait is not necessary. Simply placing the subject at a greater distance from the background will increase the chance of creating a beautiful background blur effect. The further the subject is from the background, the more of a blur the background will appear to be. Also, do not use a wide-angle lens. Look for a narrower lens. If you have a telephoto zoom lens, use the telephoto end to capture the portrait.
Focusing The Lens Manually
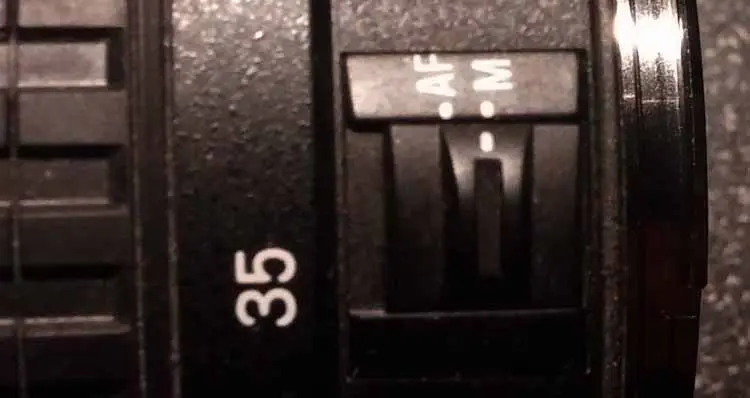
Focusing is simply a matter of ensuring that the lens shooting mode switch is set to the Manual Focus or [MF] position. Then it is a matter of turning the focus ring until the optimum point of focus is reached for the image. For a more precise focus, zoom in, turn the focus ring, and then zoom back out. The focus will be retained.
Usually, when the camera cannot focus, one can use the manual focus option.
Image Settings
ISO Speed, Still Images
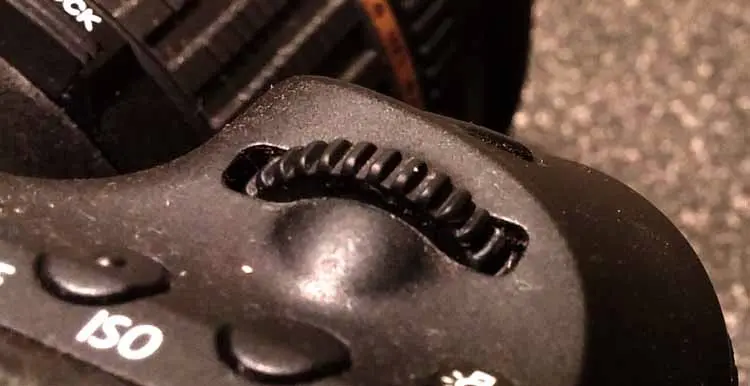
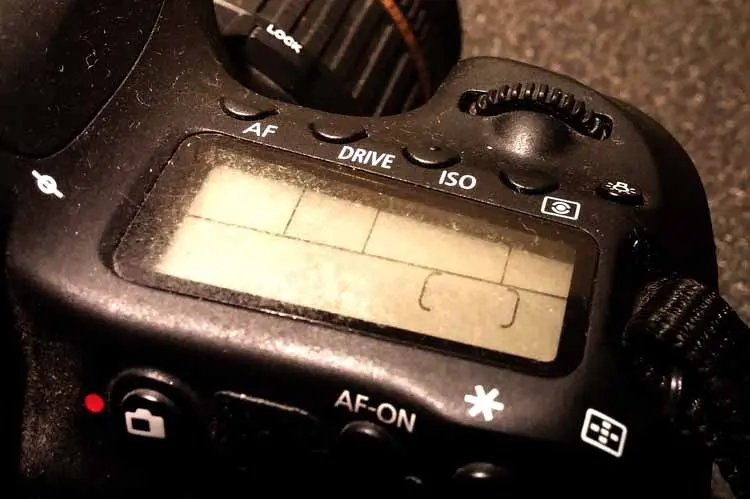
The ISO speed refers to the sensitivity of the camera’s internal image capture sensor. When operating the camera in the automatic mode, the camera will set the ISO speed. However, there is a button near the top LCD that can be used to control the ISO speed manually. After pressing the button, look for a small scrolling dial, which can be incremented or decremented through different possible speeds.

If you set the ISO speed manually, then the trick is to understand what settings to use under which weather conditions. For the nighttime or for an interior space with very little light, an ISO of 1600 to 32000 is appropriate. Be careful of using too high a speed, as the higher speeds result in higher levels of grain within the image. For dim evenings or for cloudy days, an ISO of 400 to 1600 is appropriate. Most of the time, you will find yourself capturing great imagery during days with a lot of sunshine, and this will typically require an ISO of anywhere between 100 and 400.
Picture Styles
DSLR or Mirrorless cameras have various “Picture Style” options. These styles enable cameraperson to capture images with slightly different colour characteristics and qualities. Some common examples of available picture style options include:
Auto
The auto picture style is suitable for general-purpose image capture. Images are crisp, sharp and rich. These qualities are especially useful in outdoor photography.
Landscape
Landscape picture style is optimized for the capture of outdoor environments. This picture style enhances the green and blue colours and this helps the sky and the grass to stand out.
Neutral
Neutral picture style does not enhance colours of the image. The neutral picture style offers a neutral exposure. The flat exposure allows advanced users the freedom to enhance the images exactly how they want in post-production.
Portrait
The portrait picture style was designed for taking close-ups of people. The style produces pleasant skin tones and soft textures, which is suitable for portraits.
Monochrome – The monochrome picture style creates black and white images.
Lecture 4 – Camera Controls (Part 3)
Lecture 4 – Camera Controls (Part 3)
Color Temperature (Kelvin)
Colour temperature is a measure of a light source. It is expressed in Kelvin. Lights that have a temperature of 5000 to 5500 K seem white. Lights that have a lower temperature have a yellow or red cast. Lights that have a higher temperature appear blue. In general, if your pictures have a red colour cast, then choosing a lower value will make the image colder. If the pictures have a bluish cast, then choosing a higher value will make the image warmer.
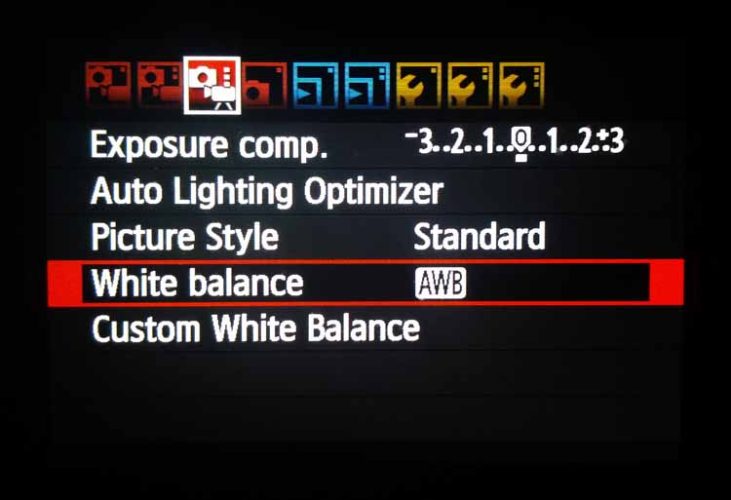
White Balance
Humans perceive lighting in a different manner than digital cameras record lighting. For example, when we look at a white object under different lighting conditions, we see that object as a white object irrespective of the type of lighting that is lighting that object. When a digital camera is used to capture a white object, the light that lights the object, ends up throwing a colour cast on the object. Only with the processing of software is the colour adjusted such that white areas look white.
So the White Balance (WB) feature is for making white areas appear white, irrespective of the colour temperature of the light source. The feature is listed in the camera menu and is available for photo and movie shooting. Usually, the automatic white balance will do a decent job to adjust images towards maintaining the white levels. However, at times the cameraperson may need to set the white balance manually by filming a white object. Or they may need to select white balance to match a light source.
Program AE

The Program AE mode is a mode on the camera, which makes the camera very easy to operate. In this mode, the camera automatically sets the shutter speed and aperture to suit the brightness level.
To take images using this mode, there are a few steps to take. First, set the round dial button on top of the camera to “program mode” or P. Second, if you are using a zoom lens, you can turn the zoom ring to the left to zoom out, or to the right to zoom in. Third, you can turn the focus ring manually if the manual focus option is set, or you can press the shutter button halfway if the automatic mode is set. The camera may or may not be able to focus. Sometimes, you may have to try more than once. To take the photo, press the shutter button all the way down.
Auto-Exposure Shooting
The camera has an Auto mode that sets all of the necessary parameters automatically. In this mode, the camera adjusts the brightness automatically.
To initiate a video recording auto mode, there are five steps. First, set the mode dial to “Auto”. On entry level Canon DSLR, this setting should have a “green square icon”. Second, set the Live View on. The scene should then become visible on the back LCD monitor. Third, use either the manual focus mode or the automatic focus mode, to focus the image. Fourth, press record to begin the recording and press record again when you wish to stop recording.
Shutter-Priority AE
In the “Shutter-Priority AE” setting, the cameraperson sets the shutter speed, the camera sets the aperture, and the camera attempts to achieve a regular exposure.
To shoot in this mode, you need to locate the mode dial. On Canon DSLR camera systems, the mode dial is located at the top of the camera. Next, set the dial to [Tv].
This mode is helpful for conveying ideas of motion. For example, two common types of photographs taken include either “blurring” the image or “freezing” the image
.
Using a slow shutter speed, such as 1/30 sec. or 1/60 sec., will allow the photographer to achieve a “Blurred Motion” effect.
Use a fast shutter speed, such as 1/2000 sec., will allow the photographer to create a frozen motion effect.
When a cameraperson attempts to blur an object or a subject, they have to choose a shutter speed that corresponds to the speed of movement within the scene. Getting a good grasp or feel as to what shutter speed to select for a particular level of object speed, will take some practice and experimentation.
Aperture-Priority AE
Using the “Aperture-Priority AE” mode allows the cameraperson to take shots with slightly different depths of fields. In the “Aperture-Priority AE” mode, the cameraperson sets the aperture, but the camera sets the shutter speed. The camera aims to capture a regular exposure. If the cameraperson sets a higher f-stop, it is more likely that elements in the image will stay sharp. If the cameraperson sets a lower f-stop, then it is more likely that parts of the image will blur.
Taking an image in this mode involves five steps. First, set the mode dial to [Av]. Second, start the Live View shooting mode. Third, adjust the aperture to achieve the desired look. Fourth, focus on the subject or object. Fifth, capture the image.

Using a small f-number, such as f/1.4, will result in a blurry background.

Using a larger f-number, such as f/16, will keep the background and foreground sharp.
Lecture 5 – Camera Controls (Part 4)
Lecture 5 – Camera Controls (Part 5)
Manual Exposure
Professionals use manual control to expose their images or videos optimally. They are able to capture the best version of an image by setting all of the main parameters themselves, rather than relying on the camera to attempt to estimate and/or guess what the most desirable image would be. Initially, it may seem difficult to grasp how changing the camera setting affects the overall look. However in time, it becomes easier to immediately select the “right settings”. You will find that you will eventually produce better work by staying in the manual mode.
To expose a manual image, there are only five steps involved. First, adjust the mode dial to the [M] setting. Second, set an appropriate ISO speed. Third, set the aperture and the shutter speed. Fourth, focus the image. Fifth, press the shutter button to take the image.
Manual Exposure (Video)
The “manual exposure” shooting mode for movies allows the cameraperson to set the key settings manually. The user can set the ISO speed, the aperture, and the shutter speed. Using manual control isn’t just for experts. It is useful for beginners to attempt to use manual controls because it is the only way to really learn how to use the camera to its full potential. Though it may be challenging, it is the challenge of trying to set the settings at the right level to gain an optimal exposure that makes the whole process fun and rewarding. In addition, using manual exposure will lead to results, which are likely to be more interesting and cinematic as well.
On the camera, there will be a dial, which corresponds to the shutter speed. There will also be a dial, which corresponds to the aperture. These may be the same dial. Rotate the dial(s) to set the appropriate settings. The shutter speed can usually be set anywhere from 1/8000 s and 30 s. Generally, the maximum aperture will be around f/1.8 and the minimum aperture will be around f/16 or f/22. The exact numbers will be dependent on the lens used.
Long Exposure (Bulb)
Bulb – long exposure (30 seconds +)
Interchangeable lens cameras have a “bulb” mode that allows the cameraperson to record long exposures. Recording a long exposure is useful in various circumstances. It is useful in low light environments such as night scenes. It is useful in creating a motion effect from a subject or object in motion.
To take a long exposure, there are only three steps. First set the mode dial to B. Second, select an appropriate aperture setting. Third, depending on your camera model, you will activate the mode in one of two ways. Either you will have to press down the shutter button once to activate the mode, and once to stop the exposure. Or you will have to press down the shutter and hold it down for as long as you want to expose the image.
Note: You will need to use a tripod for this mode.
Lecture 6 – Camera Controls (Part 5)
Lecture 6: Camera Controls (Part 5)
Metering
In this section, we describe several metering mode options, which most cameras have as an option to meter exposure. On Canon cameras, there is a metering mode button and a dial that can be rotated to select from the different options.
Metering Mode Selection
“Metering Mode” is a DSLR function that is not immediately obvious as to what it is. Metering is a feature that allows the camera to detect what the appropriate shutter speed and aperture should be. The camera is able to measure the light and determine what the proper exposure level should be. There are various metering settings available, such as: Evaluative Metering (Canon), Matrix Metering (Nikon), Center-Weighted Metering, Spot Metering and Partial Metering. Below, we describe some of these modes.
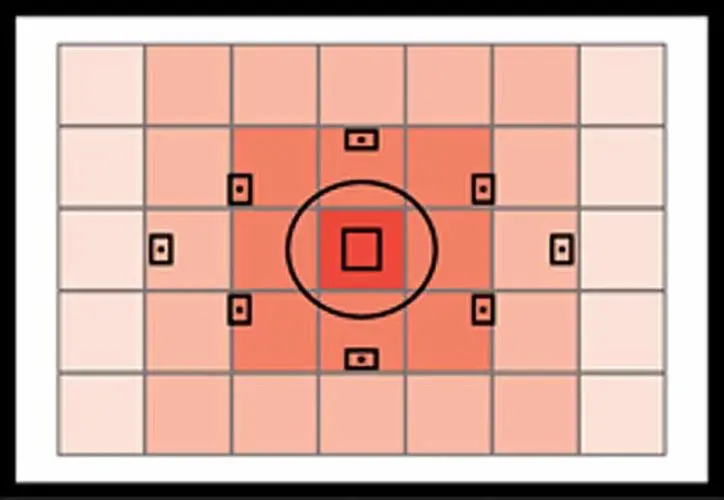
Evaluative Metering or Matrix Metering
This type of metering is used in the majority of circumstances. It is used often because it is effective in various different lighting conditions. Though the mode involves evaluating different zones within the frame for light and dark tones, the focus point is considered the most important area.
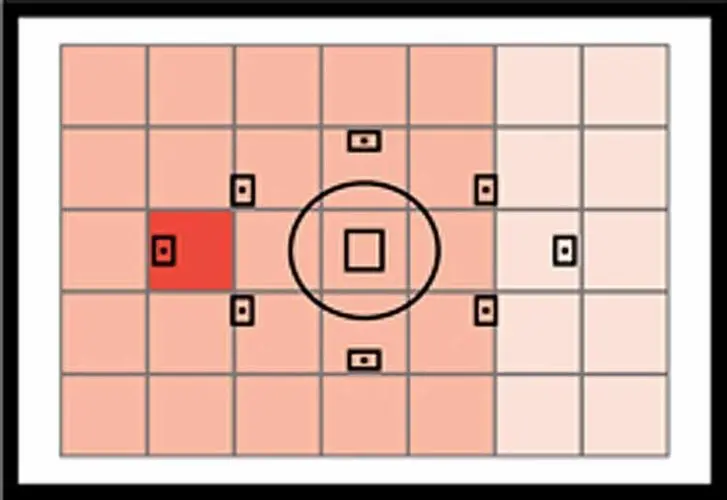
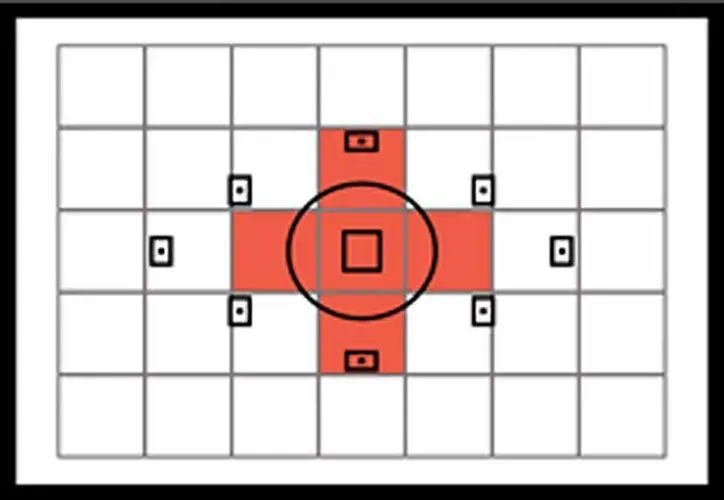
Center-Weighted Metering
In Center-Weighted Metering, the camera meters all of the zones, but meters most in the center and less so for the zones as they approach the outer edge. The “metering weight” is at the “center”.
Partial Metering
In instances when a background is brighter than a subject, partial metering can be useful. The mode involves calculating an average of light over a circular area.
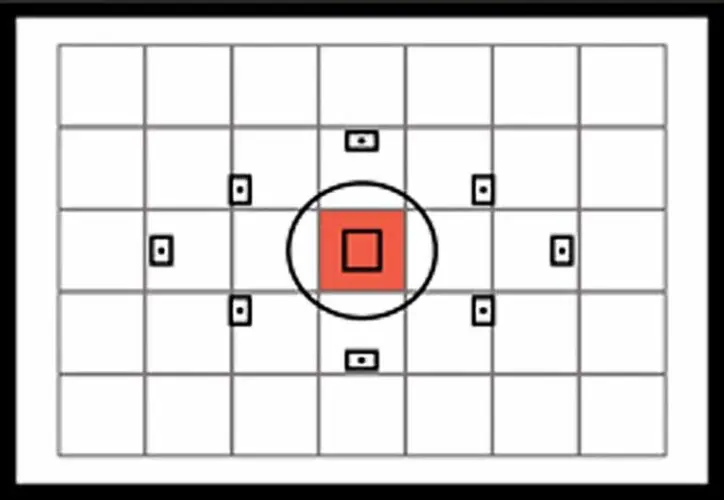
Spot Metering
The most precise form of metering is spot metering. Imagine a spot of relevance at the focus point. Exposure is calculated at that spot and the other areas are disregarded. This mode is useful if you are tracking a small moving object and wish to get the exposure right on that object.
SOUND RECORDING
DSLR Cameras
Good Interchangeable Lens Camera (ILC) systems have facilities for handling audio such as a built-in mono microphone, a microphone input jack and a headphone jack. The microphone input feature is especially important because the built in mono microphone does a poor job of capturing a natural and realistic sound of the subjects on scene, and so the ability to connect an external microphone device is essential to the success of making professional audio-video recordings.
Most cameras should have a “sound recording” option. This option will allow the user to change the sound source.
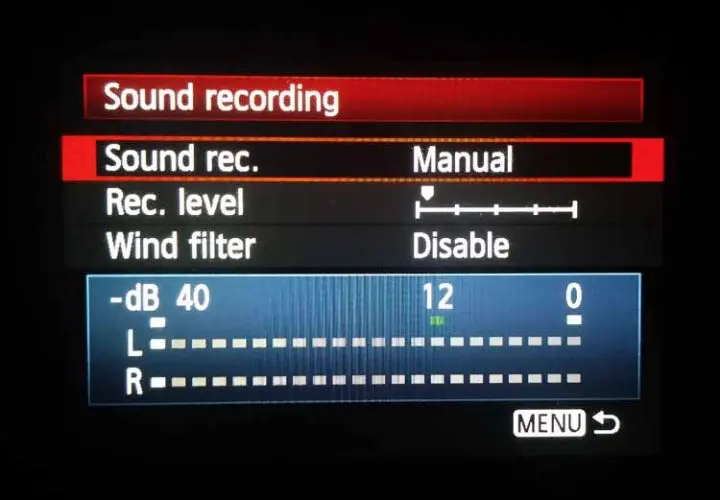
There are two main modes of operation, “manual” or “auto”. If a user chooses to record the audio level manually, then the user is responsible to choose the audio recording levels for the scene. Choosing the right level will involve running a few tests before commencing the main recordings. Setting the right levels will involve settings the levels such that they are not too loud so as to clip in the visual level meters or too soft so as to require too much amplification in post. A good range for most recordings is above -12 dB but below 0 dB. If the user chooses to use the auto mode of sound recording, then the camera will choose the most appropriate level. The audio will then be adjusted as needed to environmental sounds.
Lecture 7 – Camera Controls (Important Features)
Lecture 7: Camera Controls (Important Features)
Other Important Features
Wind Filter
The wind filter is a feature available on Interchangeable Lens Cameras (ILC) that lowers the amount of wind noise that gets recorded during noisy outdoor film shoots. The feature reduces the overall low bass sounds, which has the effect of removing the sound of wind from the recordings. Unfortunately, this feature takes away a portion of the audio spectrum, meaning that the rest of the sounds do not end up sounding as natural as they could sound. It is advisable not to use this feature if there is no wind present during the shoot.
External Microphone
Good DLSR or Mirrorless camera systems usually have a 3.55 mm diameter microphone input terminal. This input terminal allows the cameraperson to connect a high quality external microphone. Since the camera’s onboard microphone is terrible, the microphone input solves this problem by allowing the onboard microphone to be bypassed and replaced with a much higher quality audio recording device.
Headphones
Most good semi-pro and professional DSLR or Mirrorless camera systems come with a 3.5 mm diameter mini output plug where headphones can be connected. This plug allows the cameraperson to monitor the sound during movie shooting. Though it is possible to simply record audio using the visual audiometer, listening to the audio track as it is recorded provides that extra level of security and confidence that the audio-video track was recorded right.
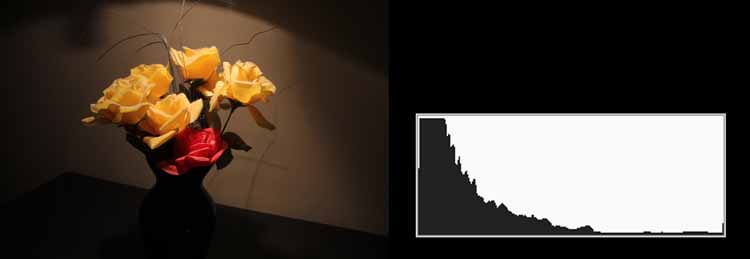
Histogram Display
The histogram is a two-dimensional chart that has a horizontal and a vertical axis. The horizontal axis represents the different brightness levels that are possible. On the left side of the horizontal axis are the dark levels and on the right side are the bright levels. The vertical axis simply represents the quantity of pixels for the different levels of brightness on the horizontal axis. Histograms can be underexposed, exposed to the left, neutrally exposed, exposed to the right or overexposed. The different levels of exposures are explained below.
Underexposed
When an image is underexposed, the histogram will show a grouping of pixels on the left side of the graph. Unfortunately, once an image is underexposed, it will be very difficult to recover the image detail with post-production software. This type of exposure will be visibly grainy. You must avoid underexposing images. Carry low f-number lenses with you and consider opening the shutter for longer periods of time.
Exposed To The Left
Exposing to the left is ok. Exposing to the left happens often during night-time shooting. Bringing up this exposure in post can lead to noise. It is important to use a low f setting or shutter speed in these circumstances.

Neutral or Optimal Exposure
It is a good practice to film shots with pixels evenly distributed throughout the tonal range. From this point, you can adjusts the image up a level in brightness or down a level in brightness, according to what level would make the image most cinematic. Though this exposure style may result in an image that may sometimes seem a bit too dark or too bright, the exposure style provides a lot of latitude to tweak in post.

Exposed To The Right
When exposing to the right, be careful not to overexpose. This type of exposure will produce an image that does not have a lot of noise. Though it may seem bright while recording, it is likely possible to bring down the image a little bit in post.

Overexposed
If the image shows up on the histogram as a cluster of pixels on the right side of the graph, then the image is overexposed. Under this condition, you will have to use a smaller ISO setting. The lower ISO settings are less sensitive to light. The lower settings will capture less light. Therefore, more light is needed for a “good” exposure. Using a lower ISO setting will result in an image with less noise or grain. Conversely, the higher settings are more sensitive to light. The higher settings will capture more light. This means that less light is needed for a “good” exposure. However, using a higher ISO setting will result in an image with more noise or grain. Remember, if highlights are blown out, then it will be difficult if not impossible to recover information from such an area. It is best to adjust the ISO accordingly so as to avoid overexposure.

To see our Donate Page, click https://skillsgaptrainer.com/donate
To go back to our Home Page, click https://skillsgaptrainer.com
To see our Instagram Channel, click https://www.instagram.com/skillsgaptrainer/
To see our Twitter / X Channel, click https://twitter.com/SkillsGapTrain
To see our YouTube Channel, click https://www.youtube.com/@skillsgaptrainer
To see some of our Udemy Courses, click SGT Udemy Page
“Discover the future of learning with Skills Gap Trainer, where technology meets art, and education transcends boundaries. Our innovative curriculum in AI, blockchain, user experience, digital marketing, and more, isn’t just about acquiring skills — it’s about mastering the art of possibility in a digitalized world. By linking to us, you’re not just sharing a resource; you’re igniting a beacon of knowledge that enlightens paths in technology, leadership, and beyond, for a global community of learners. Join us in our mission to bridge the skills gap and shape the future of education. Together, let’s empower minds across Canada, America, Europe, Britain, India, and beyond. Link to Skills Gap Trainer – where learning meets innovation, and every click opens a door to endless possibilities.“