In the 21st century, many companies require a professional video production capacity to connect and spread information about their products and services to the rest of the world. Visual communication is a skill that is both essential and in demand. This guide focuses on the specifics of how to use a leading edge camera platform, the DSLR camera, to its full potential so that you are then able to succeed in shooting a professional quality video project. The nature of the project, documentary, film, music video, corporate video, business video, educational video, and so on is not what is essential. The core skill of using your camera and production equipment effectively is something that can be taken with you and applied to make media of any type as required in your future endeavours. After reading the guide, you will have the necessary insight to shoot any type of video and most importantly, will be able to avoid many of the production mishaps that can happen when doing recordings of audio and video. Even if you have used many cameras before, in many projects, production is something that must constantly be learned and relearned so as to maintain the skills at high level, and thus ensure every new production is as good or better than the last. Specifically, you will also learn about the pre-production, production, and post-production process.
TABLE OF CONTENTS
- PRE-PRODUCTION a. Pre-Production
b. Story Structure
c. Shot List & Storyboards
d. Scouting Locations
e. Casting
f. Scheduling
g. Rehearsals & Blocking
h. Legalities - PRODUCTION a. Use A DSLR Camera
b. Manual Camera Controls
c. Composition
d. Lighting Techniques
e. Audio Recording - POST-PRODUCTION a. Editing, Transcoding & Intermediate Formats
b. Primary Correction And Secondary Correction
c. Music
d. The Master, The Backup & Exports
PRE-PRODUCTION
The three phases of producing video projects are: pre-production, production, and post-production. In pre-production, one prepares and sets-up the production to get going. In production, the actual shooting in the studio or on location will take place. Production includes all of the days of filming. In post-production, the editors for sound and audio edit the best scenes, apply effects, and package the production for distribution.
1.a) PRE-PRODUCTION
Pre-production is the stage of a video project that happens right after the various parties involved agree and decide on the production of a video. Since most projects are not studio projects, where things such as power, lighting, electrical, and sound can be controlled in detail, the producer in the field really has to rely on the circumstances at hand. Therefore, good planning will allow for a minimization of the risk involved in project managing a complex media project. There are quite a few things that need to be completed during the pre-production phase, before you can go on to the production phase. These include
Writing A Script
Budgeting
Scheduling
Recruiting Crew
Auditions
Recruiting Talent
Location Scouting
Permits & Releases
Building Sets
Blocking & Rehearsals
Props & Costumes
Renting Equipment
Production Meetings
Equipment Preparation
1.b) STORY STRUCTURE
The structure for the various types of videos, whether a corporate video or a fictional narrative, is usually in three acts. In corporate video, the script is broken down into three parts: a beginning, middle, and end. Here is an example layout for the script. At the beginning, one can see an introduction to the difficulty, challenge, or problem that needs to be overcome. In the second part, one could show what’s complicated about the problem. And in the last part, a solution should be offered. In short, whether fiction narrative or corporate video, the story needs to have a recognizable structure similar to other works in similar categories.
1.c) SHOT LIST & STORYBOARDS
The shot list, it is a document which lists all of the shots in the scene. For example, a typical scene might include a wide shot (WS), two medium shots (MSs), and two close-ups (CUs). The storyboard is an even clearer way of expressing the sequence of events that will appear on camera. It allows for a very fast and efficient communication with the crew.
1.d) SCOUTING LOCATIONS
The scouting phase is a continuation of the vision, as it adds the missing visual layer to the story. You need to make sure to look for interesting and cinematic scenery and to find good visual angels, which will work to tell the story. It’s also of key importance is to ensure that the location will work logistically. You will need to consider the power requirements of the shoot and whether the location can supply that power or whether you will need to bring batteries and generators. You will need to check out the audio considerations. Is the location in a place that is very busy and noisy, or is it a quiet location where a production could potentially disturb others? Further, an assessment of the overall lighting characteristics will need to happen. A lighting plan will need to be developed which will involve determining the kind of equipment that will need to be brought on the day of filming.
1.e) CASTING
The producer must advertise the production to potential actors and actresses. Good places to look for talent includes; local theatre groups, modelling agencies, acting agencies, media equipment societies, film and video societies, post-secondary drama departments and comedy clubs. After advertising the talent, and getting in touch, the producer will need to set up audition meetings so as to select the cast that will best fit the vision of the director.
1.f) SCHEDULING
Scheduling a production can be a little bit stressful because there is always the risk that you may not be able to organize all of the elements to come together on the different production days that are required to be there. Things can go wrong, and shoot days may need to be rescheduled. The schedule though, it holds a production together. It is the main step in converting what you see on the paper script to the image on the camera. It allows the director to plan what resources and people will need to be where and when, and to communicate that information to the crew and cast so that everyone remains coordinated.
1.g) REHEARSALS AND BLOCKING
Rehearsals and blocking allow the actors to work together and to figure out how to best play the scene off of each other. Rehearsals do not just benefit the actors, but they also benefit the director and the cameraman. The director and cameraman can run through the scene and this helps them to figure out where to best place the camera in relation to the movement of the actors.
1.h) LEGALITIES
The producer must consider the different legal implications of creating a media production. There are some basic steps that every producer must take in order to limit the potential of liability when doing a media production.
Location Permit – A location permit is a form that grants the production permission to film on a private property. The producer must get the consent of the property owner and have it in writing.
Actor Releases – Actor releases are also called talent or model releases. These forms are your way or proving that they have consented to be filmed in your media project.
Copyright – While filming scenes in different places, you may find that some of the things in the background like certain statues, architecture, or pieces of art are copyrighted. Some of these things require that you obtain clearances.
2) PRODUCTION
Production is the phase of the video project where the actual filming takes place on location.
2.a) USE A DSLR CAMERA
The image sensor within the DSLR picture cameras is much larger than a traditional video camera, which allows for a much greater ability to record in various lighting conditions. In addition, whereas a traditional video camera uses a fixed zoom lens, the DSLR camera allows the user to change lenses as needed.
Prime Lens – Prime lenses have a single angle or a single perspective.
Zoom Lens – Zoom lenses contain multiple focal lengths all within the same lenses.
Tripod – The tripod is stabilizes the camera work and helps the shooter attain a cinematic loo.
2.b) MANUAL CAMERA CONTROLS
Anyone who wishes to improve the quality of the imagery they shoot through a DSLR needs to consider that they must operate the camera in a manual matter, rather than an automatic manner. Examples of essential controls, which a camera needs to have, includes; focus, aperture, iris, shutter speed and white balance.
EXPOSURE
The term exposure refers to the amount of light that is let in onto the image sensor. If you film with too much light, then the image will clip. If you then try later to fix the overexposure in post-production, you will find that you cannot bring out any information from clipped areas of the frame. When it comes to underexposure, there are fixes that can be made after the fact. For example, if a scene is recorded too dark, there is still detail in the recording that can be brought up with post-production tools. The only downside is that, as detail is brought up into view, there will also be visible grain that will show up.
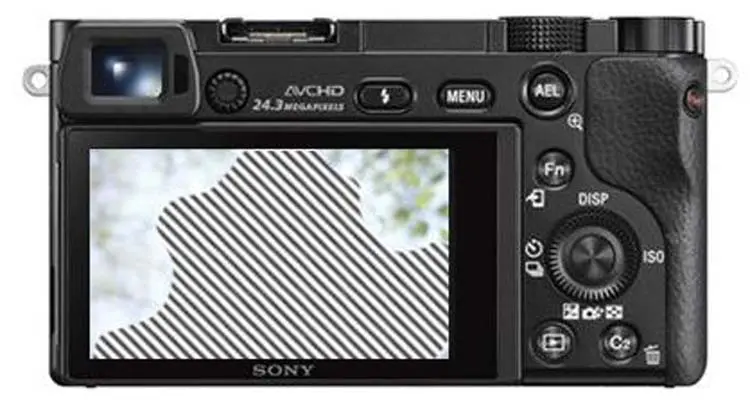
This is an image of the LCD display. I’ve turned on the Zebra Stripes, which highlight the areas of overexposure within the frame. In this image, pretty much everything is overexposed.
There are three essential exposure related settings in your camera: aperture, shutter speed and ISO. These three settings are referred to as the exposure triangle.
APERTURE
At the back of the lens, you will find the iris mechanism, which opens and closes to allow light into the camera. The iris can be opened up to allow light in, or closed down to reduce the light that enters the camera. If it is more open, then the iris does not stop a lot of light, and the f-stop value is smaller. If it is more closed, then the iris stops more light, and the f-stop value is larger. The opening is referred to as the aperture.
On the picture, we can see that the iris on the left is closed down more than the iris on the right, so therefore, it stops more light.

SHUTTER AND THE GAIN/ISO
It’s not always necessary to alter the shutter speed or modify the ISO/Gain. You should be able to achieve proper exposure under most circumstances with a good set of lighting equipment and high performance low light capable prime lenses. If you absolutely need to increase your ISO/Gain, be aware that this will introduce some noise into the image. As for shutter speed, it’s best to set it according to the frame rate. If you are shooting at 24 frames per second, and hopefully you are, then double the frame rate to 48, and set the shutter to about 1/48th of a second.
USE HISTOGRAM TO APPROXIMATE EXPOSURE
The histogram can be used to gauge exposure. If most of the tones are all in the dark area (the left), you want to check that you are not crushing the blacks. If most the tones are all in the light area (the right), then you want to check that you are clipping the highlights (or overexposing the highlights). The range should end gradually as it reaches the sides. Make sure you adjust the aperture to get the look that you want, but at the same time, check out the histogram as it changes to confirm that you are at an acceptable level.
PRODUCING SHALLOW DEPTH OF FIELD
Many people, who’ve never used a DSLR before, wonder how that “focused subject and soft background” is achieved. A sharp medium-close up with a soft background can look absolutely stunning. It’s one of those indicators to the public that a professional must have filmed the project. Here are some tips. If the scene is dark, open up the lens. If the scene is bright, opening up the lens will overexpose the image, so add an ND filter to allow the opening of the lens. Try using a long telephoto lens. Try using a fast shutter speed. Try decreasing the gain/ISO.
WHITE BALANCE
White balance is the method through which the camera can adjust itself oR be adjusted to produce an image that is realistic and free from colour casts. As a result the whites will appear as white. DSLR cameras have the option to white balance the shot either through an automatic method or through manual control. Though you can use the automatic white balance feature, it is much better to take control and manually white balance.
2.c) COMPOSITION
The difference between the shots, is simply a difference in which portion of the image the shot is focused on. The common types of shots used in film and video projects are:
- WIDE SHOT (WS) – The wide shot shows the entire actor or group of actors, from top to bottom. The entire scene is visible.
- MEDIUM SHOT (MS) – The medium shot shows the upper body and head of the actor.
- MEDIUM CLOSE-UP (MCU) – The medium close-up focuses on the detail of the actors, usually the face and upper chest.
- CLOSE-UP (CU) – The close-up shot is when you film the upper shoulders and the face of the actor, or simply the face and neck, and this will highlight an emotional and dramatic scene.
- EXTREME CLOSE-UP (ECU) – The extreme close-up will just feature the face.
- OVER THE SHOULDER (OTS) – Over the Shoulder shots help to maintain the feeling that the actors are talking to one another, rather than to the viewer.
STANDARD COVERAGE
When you record a scene, you will have to get a few standard shots, before you get creative with more elaborate shots. The standard shots are your way of ensuring you have at the very least a minimum editable sequence that will work in post. You first start off with a wide master shot that includes all elements in the scene. Afterwards, you move in closer to the scene, by filming a medium of the actors, and then you follow up with close-ups of the actors. Having multiple perspectives or angles of the same action, will allow the editor the freedom to edit a basic but professional looking scene.
180-DEGREE RULE
Scenes must be filmed in a way so as to maintain the viewer’s orientation of left and right. This is where the 180 Degree Rule comes into play. It states that an imaginary line must exist in the scene, and all shots must usually be taken from one side of that line so as to maintain the orientation of the viewer. If you move the camera to the other side of the line, the sequence may not cut together. For example, you might get mismatched eye-lines.
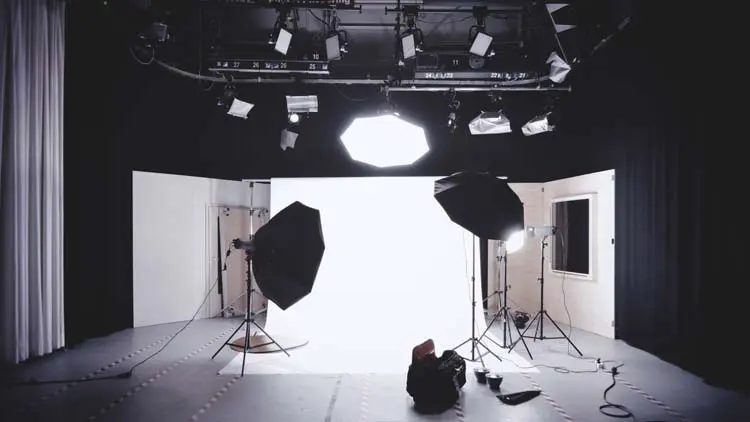
2.d) LIGHTING TECHNIQUES
LIGHT QUALITY
Lighting is used to create the director’s vision by creating mood and atmosphere.
On set, light is often described as hard or soft. This is a subjective assessment, which requires that one observe the light. So what is hard light and what is soft light?
Hard Light Quality – If a light source is small, and if there is no diffusion between the light and the actor, and it is intense like a single spotlight beam, then the light will have more contrast and will be hard.
Soft Light Quality – If a light source is of a larger area, and there is diffusion between the light and the actor, and it is bounced, then the light will have lower contrast and will be considered soft.
LIGHTING AN INTERVIEW
Three Point Lighting – Under three point lighting, you point three different lights towards the subject, but the lights are positioned around the subject and are angled at the subject from different angles. The three lights are the “key light”, the “fill light”, and the “backlight”. A scene could easily require more lights than this, but the process begins with three-point lighting.
The key light is the main light in the scene. It is the most important light. It will give form to the object being filmed. It will light the object or subject and the areas around. It will create shadows. Usually, you want to place the camera about a 45-degree angle from the key light.
The fill light is on the other side, or opposite, the key light. If the key is positioned on your left, then the fill would be positioned on your right. The fill is a soft light, and should be diffused. You can even bounce the light off of a white board.
The backlight is the light behind the subject, and up and above the subject, pointing downwards towards their back. It creates an edge of light along the hairline and around the clothing, which helps to accentuate and provide detail to the edges.
USING REFLECTORS
It takes a lot of light to be able to bring the level up enough to work during bright daylight. Most studio light kits are just not that powerful. A much easier solution is to just bring a couple of inexpensive and very lightweight foil reflectors and bounce cards. By bouncing light from the sun with a reflector or bounce card, or blocking light from the sun, or even diffusing the light, it becomes possible to light a scene professionally, but without using lights!
BOUNCING
Sometimes so much focus goes into just lighting the scene that too much light may be thrown on the subject. The intensity needs to be controlled, and the best way to do this is to dim the light, or take the light further back from the subject, or simply by bouncing the light with a white card.
ADDING DEPTH
Making a video look professional can be done by enhancing the three dimensional aspect of the scene. One can place table in the scene, some plants, or a cabinet drawer. Anything that can convert an otherwise bland room, into a room where it is obvious how deep it is, should enhance the cinematic appeal.
SHADING
Shading, or shooting scenes with some shadows in them, can make the scene look interesting. Sometimes, inexperienced lighting designers try to remove all shadows from the scene. This can make the scene look lifeless, uninteresting, and flat. Don’t be afraid to create interesting textures with shadows.
LIGHT GELS
Gels are very useful, especially indoors. Gels allow you to colour your scene. With colour, you can enhance a dramatic moment, or make something look cinematic.
DIFFUSION
Diffusion is usually some sort of fabric that is placed between the subject and the light source. It helps to soften the sharp edge that the digital look often produces. You can cover the lights with diffusion fabric, by clipping on a diffusion paper onto the barn doors of the light.
POWER SUPPLY
If you run too many lights from the same circuit in a room, you can blow the fuse. And if, by any chance, you don’t have access to the fuse, your shoot is over. It’s always best, to use a few extension cords so as to run some of the lights off other circuits in other rooms.
2.e) AUDIO RECORDING
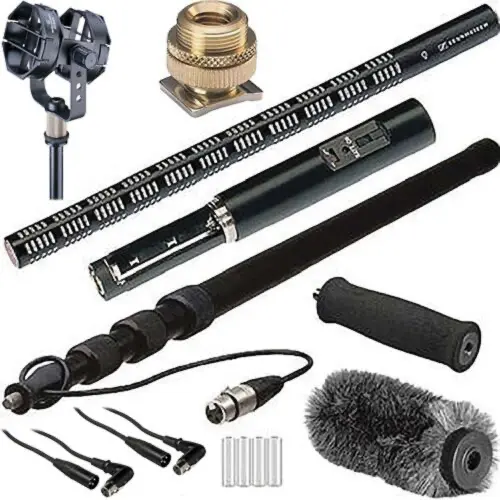
SHOTGUN MICROPHONES
Shotgun microphones are typically attached to the camera or to a boom pole. When someone holds the boom pole above the actors, the microphone captures the dialogue of the actors, but also the associated environmental sounds such as footsteps. In addition, since the microphone does not pick up sounds on the side, then this helps in reducing background noise from getting into the recording. There are two disadvantages that you will need to deal with. One, the shotgun microphone on a boom pole is susceptible to handling noise. Two, anytime you use a microphone outside, it is susceptible to wind noise. Make sure you cover the microphone with some sort of foam such as a windscreen.
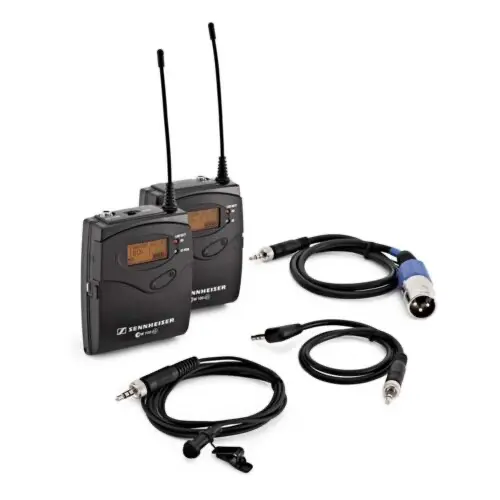
LAVALIER MICROPHONE
Lavalier microphones sound rich, personal and high quality. The reason a lav sounds like this has to do with how close it is positioned to the subject’s mouth. Usually, it is pinned on the blouse or shirt or tie, and at this distance, the microphone is very effective at picking up a rich vocal track. One thing to note is that this microphone is made for picking up just the sound of the person wearing it, so you will pretty much need a lav for every person appearing on camera. If you’re shooting in the studio, you can easily use a wired lavalier microphone. However, when you are on a set with multiple people in the field, then a wireless lavalier kit will be handier.
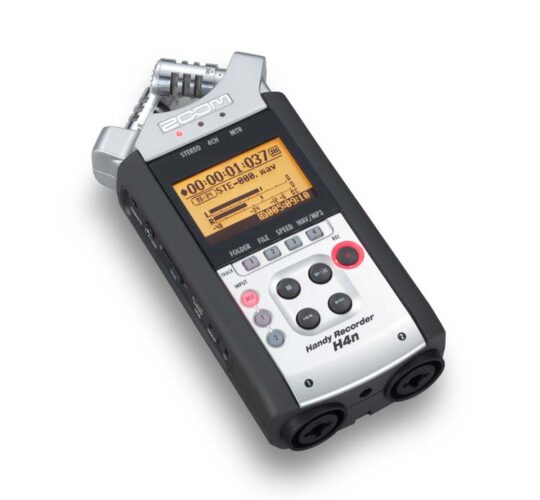
EXTERNAL RECORDING DEVICE
DSLR cameras have a very poor microphone built into the camera. People that use the DSLR’s for video projects, use a “double system sound”. Double system simply means recording a scene with two devices. First, the video and audio are recorded with the DSLR camcorder. In the video file, will be the reference audio track, the one you will use to sync the sound with, but not use in the final produced video. While recording with the DSLR camera, the second recording device will be the external audio recording device, for example, the Zoom H4n. The Zoom H4n will have it’s own higher quality built in microphone, which can be used, or it will have XLR inputs, which will allow you to use a professional quality XLR microphone. The Zoom H4n will have an 1/8th inch jack, which will allow you to attach a special wire from the H4n to the DSLR’s microphone input. This will make sure that the same microphone that is used to record the professional sounding track onto the H4n will be also be used to record the reference audio track to the DSLR.
AUDIO MONITORING
While preparing an interview, one should ask the host and the interviewee to have a conversation, or to read from a script, at the same level that they would normally talk at during the actual recording. They will need to do this for a few minutes so as to give the necessary time to the audio recording expert to check all of the connections, check that the computer or recording device is doing the recording, and monitor and adjust the levels as necessary.
SETTING AUDIO LEVELS
One of the tricky things with recording audio is setting the appropriate recording level. The recording devices have a 0 dB limit, and if the level exceeds this amount, clipping will occur, resulting in a recording with digital distortion. However, if the level is set too low, then the recording will be quiet, and it will be required in post too amplify or boost the signal. Boosting a weak signal will result in a signal with a lot of noise, which will frustrate the audience. As a general rule, you should set your recording level somewhere between -20 dbFs to -10 dbFs for a good sound. The maximum is about -6 dBFS, but I would keep it about -10 dBFs at most.
HEADPHONES
Headphones are important because it is not possible to determine whether the audio is getting recorded properly by simply looking at the VU Meter. To be able to tell if the recording is clear, or if it has distortions, or if it is unbalanced between the different elements, these things all require an active listener.
3) POST-PRODUCTION
Simply put, post-production is the phase after production. There are various stages that one must go through to professionally post produce a video project.
- Import Video Clips
- Backup Video Clips
- Edit Video Clips Into A Sequence
- Add Graphics, Effects, Titles
- Perform Colour Corrections
- Apply Film Looks
- Add Sound Effects
- Add Music
- Export Master File
- Backup Master File
- Create Web Copies
- Distribute Web Copies
3.a) EDITING
Editing is the process of importing footage, making splices which allow the editor to remove unwanted takes, and then to assemble shots in order so as to make an effective presentation. When it comes to editing, it is best to stick with simple cuts, and to try to migrate towards a professional editing program if your using an entry level program.
SYNCING VIDEO AND AUDIO
The editor can sync footage manually. The editor first finds the section of the take where the clapboard closes. The closing of the clapboard will produce a spike on the audio track, which will be very visible and very defined. The editor looks at the spike in the original low quality audio track, and then finds the same spike in the new high quality externally recorded track. The editor then proceeds to align the two audio tracks, by aligning the spikes of the two tracks.
TRANSCODING AND INTERMEDIATE FORMATS
When you film a scene, the camera will record the visual and audio data to compressed files. The next step is to import the files for editing into the computer. The editing application has the ability to edit the files in their native form, but professionals often do one more step. They transcode the compressed files, or convert them to another codec, to an intermediate format, which is less compressed. By converting to an intermediate, effects work and colouring work can be done at a higher quality level, and the final export can maintain its quality. A common intermediate format is Apple Pro Res and that is available through Final Cut Pro. Another common intermediate format is Avid DNxHD, which is available on editing programs such as Media Composer.
3.b) PRIMARY CORRECTION AND SECONDARY CORRECTION
Colour correction allows the editor to correct problems with the image. For example, if the image is underexposed, you can pull up detail from the darks by increasing the brightness. Primary Correction refers to changes that are made to the whole image. The goal is to ensure colour and contrast continuity, that is, to ensure that shot after shot are matched in colour and contrast. Secondary Correction is more specific than Primary Correction. Secondary correction refers to changes that are made to only a portion of the image. A mask is often used as a selection tool to ensure corrections are done only within predefined areas.
3.c) MUSIC
Music is often a key component of a video project. A project usually needs at
least one, but often a few pieces of music to create an impactful presentation.
3.d) THE MASTER, THE BACKUP AND EXPORT
You want to make sure to save all of that work in the most optimum file container format. It’s best to export the final copy of the project to ahigh-resolution master file. That file, usually in Avid DNxHD or Apple ProRes, will preserve the quality of the work in a format that’s, as close to uncompressed quality as possible, but without the huge storage requirements that uncompressed would require. Also, it is a good idea to make a backup copy, a duplicate copy of the master file. From this master file, most likely need to transcode to highly compressed formats for digital delivery on the web.
Related books and resources:
“The DSLR Filmmaker’s Handbook: Real-World Production Techniques” by Barry Andersson and Janie L. Geyen – This comprehensive guide covers all aspects of creating videos with DSLR cameras, from pre-production to post-production, and is great for readers looking to expand their knowledge beyond the basics.
“Cinematography: Theory and Practice: Image Making for Cinematographers and Directors” by Blain Brown – This book is an in-depth resource on cinematography, covering technical aspects as well as the artistic considerations of visual storytelling, which complements the composition and lighting sections of our guide.
“The Location Sound Bible: How to Record Professional Dialog for Film and TV” by Ric Viers – This is an essential read for understanding audio recording in depth, particularly beneficial for readers interested in improving their skills in capturing high-quality sound for video.
“Film Directing Shot by Shot: Visualizing from Concept to Screen” by Steven D. Katz – This book covers the visual language of filmmaking, particularly the use of shot lists and storyboards, enhancing the reader’s understanding of pre-production planning.
“The Filmmaker’s Eye: Learning (and Breaking) the Rules of Cinematic Composition” by Gustavo Mercado – This book focuses on the principles of cinematic composition and can help readers understand how to create visually compelling shots, an important aspect covered in our guide.
“Color Correction Handbook: Professional Techniques for Video and Cinema” by Alexis Van Hurkman – A detailed guide on color grading and correction which complements the post-production sections of our article, especially on primary and secondary correction.
“Producing with Passion: Making Films That Change the World” by Dorothy Fadiman and Tony Levelle – While more focused on documentary filmmaking, this book also delves into the passion and drive needed to create impactful video content, aligning with the purpose-driven approach of our guide.
“The Business of Media Distribution: Monetizing Film, TV, and Video Content in an Online World” by Jeffrey C. Ulin – This book can provide readers with a deeper understanding of the distribution aspect mentioned in our post-production section, particularly relevant for those looking to distribute their videos effectively.
“Lighting for Cinematography: A Practical Guide to the Art and Craft of Lighting for the Moving Image” by David Landau – A detailed guide that can help readers delve deeper into advanced lighting techniques and styles, complementing our section on lighting techniques.
“The Art of Editing in Film and Television: Editing and Post-Production” by Roger Crittenden – This book delves into the editing process, offering more depth on the post-production phase covered in our guide, from cutting to final delivery.
To see our Donate Page, click https://skillsgaptrainer.com/donate
To see our Instagram Channel, click https://www.instagram.com/skillsgaptrainer/
To see some of our Udemy Courses, click SGT Udemy Page
To see our YouTube Channel, click https://www.youtube.com/@skillsgaptrainer